Tuesday, December 10, 2013

Wedding Dress Diary: Part 1

October
After trekking to NYC to buy the fabric, I am finally emotionally ready to start the wedding dress.  I still have 6 months, so I don't feel rushed, but it's time to get moving.  Somehow, making the dress makes the fact that she is getting married more real.  I feel like I'm loosing a daughter.

My first challenge was laying and cutting out.  The china silk I chose for the lining and the silk organza underlining was not wide enough to accommodate the train.  I had to buy more.  As much as I enjoyed my fabric shopping trip to NYC, I didn't really feel like going back so soon. But I made adjustments to my schedule and planned to go back.  But, before jumping on the train, I made a trip to Jack B's, on Philadelphia's Fabric Row, the store that burned down when I first shopped for wedding dress fabric.  (They were able to reopen right across the street.)  And, praise God, they had just the silk and organza I needed. No trip to NYC was needed.

My first task was to sew the organza underlining to the dress pieces.  I wanted to have the shell of the dress done so DD could try it on when she was in town for her shower.

November
I was able to finish the shell for a fitting.  All that was required was to take the sides in.  When Linds tried on the muslin, she wanted a loose fit, but my
My bestie's DD & my younger sister at the shower.
younger sister (who was in town for the shower) and I were able to convince her to have a closer fit.

I finished the dress, except for the hem, before Thanksgiving and took several weeks off before starting the lace overlay.

December
The lace is tuning out to be as big a challenge as I feared.  It's very soft with a beautiful hand -- not at all like the crap I used in the muslin.  But, it is still a challenge.  I decided to use a 4 thread overlock for the seams.   When the lace overlays the satin, the seam is practically invisible.  When it overlays Lindsey's skin, it will be finished nicely.


It is nearly impossible for me to distinguish the right side of the lace.  I hope it's just as impossible for everyone else, because I can't guarantee I made the distinction correctly every time.  Once the lace is ready to be permanently sewn together, I'll have one more challenge.  For some reason, I thought basting using pink thread would be good because it would be easier to see and remove from the lace.  Then I thought, "I might not have to remove all of the basting.  I can serge right over it."  So now, half is basted in pink and half in white. Oh well, one learns through one's mistakes.  Anyway, the lace overlay is basted and ready for the next fitting, which will take place when Lindsey and I are together for her last Christmas as a single girl!

I don't plan to do any sewing for myself until this wedding dress is finished.  I've taken breaks, sometimes long ones, between phases but now I'm ready to move and get this job done.

§ § § § § § § § § §

PS:  Praise God!  Lindsey's fiancé came home safely from Afghanistan!

Friday, October 25, 2013

Burda v. Burda

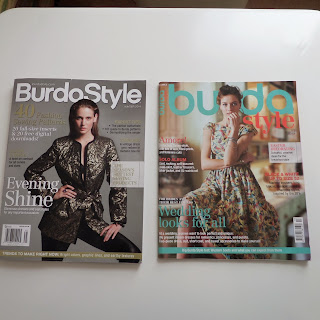
Since I'm such a big fan of BurdaStyle magazine patterns,  I was intrigued when I heard a US version of BurdaStyle magazine would be published.  I bought a copy so I could do a comparison.

I only use the Plus sizes, so my comparison is limited. The plus collection in the US version was the collection from the March 2013 European/English issue.  I didn't check to see where the other patterns came from.  I was a little disappointed that the patterns were from seven months ago.  Maybe future issues will be more current.  Since magazines are put together so far in advance, that probably won't happen.

When I was a BurdaStyle neophyte, my biggest complaint about the European/English edition of BurdaStyle was the vague and awkwardly translated sewing instructions.  The US version promised clearer instructions.  I compared the instructions for jacket 138.

BSM 03-2013-138
European: Pin facings right sides together with jacket.  Pin lapel fold lines together.
US:  Right sides together, pin facings to jacket, with lapel fold lines together.

European:  Stitch lining to inside facing edge, right sides together.  Lay lining inside jacket with wrong sides facing, pulling linings into sleeves
US:  With right sides together, stitch lining to inside facing edge.  With wrong sides together, lay lining inside jacket pulling linings into sleeves.

Now that I've had a chance to compare the two instructions, they don't seem to be all that different.  I don't know what I was complaining about all those years.

The US version has more editorial content, much like the original German version.*  Both versions include information on how to use BurdaStyle patterns.  This is featured more prominently as editorial content in the US version.  Both versions have illustrated step by step instructions for one garment.

Some, but not all of the patterns are included in the US version.  Some have to be downloaded from BurdaStyle.com and … *gasp* … taped together!  I don't mind tracing, but taping and tracing might be too much for me.

This new US version is perfect for sewers who are curious about European pattern magazines.  I imagine a sewer buying a few issues of the US version, falling in love with the patterns and fit, and then switching to the unadulterated European/English version.  However, a sewer could get the BurdaStyle experience by sticking with the US version.

*See Monkeyroom's video comparison:  Click Here

Tuesday, October 15, 2013

The Great American Dress Project

"The Great American Dress Project" might be a little hyperbolic.  A more accurate statement might be, "I've got three dresses in my queue."  While putting away summer clothes, I realized I just didn't like most of the dresses in my closet.  Some went into the trash and some will be donated.  I went into SWAP Mode and sat down with my Burda index and Vogue Fabric Store swatch catalogs. I selected four dresses I liked and found suitable fabric (I hope) for three of them.

After lengthy cogitation (I love that word!),  I concluded the problem with the discarded dresses was the poor fabric choices I'd made.   Choosing the best fabric for a project continues to be a problem for me.  The few dresses from my closet that I didn't throw out were made from solid or nearly solid fabrics.  So, with that in mind, I made the following choices:

BSM 08-13-138

BSM 01-13-133B 

BSM 06-13-143


Another dress in my queue is my Mother of the Bride Dress.  After an initial misstep in fabric selection, I have made the following assignment:

BSM 09-09-138
  

I hope I've made better fabric choices with these dresses.  I don't want to throw these dresses away next year when I do my closet change-over.

Friday, September 27, 2013

Wedding Shopping in NYC

It was time to shop for wedding dress fabric.  And where else to shop but the fabulous fabric stores in New York City?  I originally planned to shop alone because I had a singular purpose and I didn't want to be distracted.  This was not a social shopping trip.  But, I'm so glad I changed my mind and contacted Nancy K and she agreed to meet me.  We arrived at Penn Station within minutes of each other, had lunch and hit the stores!

Just a peek
The major feature of Lindsey's dress is lace and I needed wide yardage, which might have been difficult to find anywhere else but New York City.   I downloaded and printed a Garment District Shopping Guide from a few years ago.  The guide listed a store named Lace Star.   Perfect, right?  I googled Lace Star and discovered Lace Star was now Fabrics & Fabrics. (See more information here.) Nancy had Fabrics & Fabrics on her list as well, so we went there first.  What a fabulous place!!!   A phenomenal selection of special occasion fabrics.  An impressive selection of every other kind of fabric.  I originally planned to find what I needed at  B&J Fabrics, but we never made it there after visiting Fabrics & Fabrics.  I found 95% of what I needed for Lindsey's dress there.  The sales associate was extremely patient and helpful and I sought out the owner and told him what a gem she was.  Because I bought so much, the associate was able to be flexible on the prices and the dress came in under budget.

A better choice
Since I came in under budget, I could buy something for myself at Mood Designer Fabrics without guilt.  I'd changed my mind about the pastel satin fabric I bought for my MOB dress.  What was I thinking?  I'm not a pastel satin kind of person.   (I can use that satin to make a dress for Lindsey's next Marine Ball.)  I had shantung in mind when I first considered my MOB dress.  I found a dark teal iridescent silk shantung.   The iridescence gives the fabric a really dressy look and I think the color is more suitable for a mother of the bride.  I also bought a piece of denim from Mood.  I wanted to make a pair of colored jeans that seem to be the current style.  But, I didn't want to have the same buyer's remorse I had with the pastel satin, so I found a light blue denim with a little pink woven in to add color.
Denim with a touch of pink

This was an extremely satisfying shopping trip.  I found exactly what I needed for the wedding dress, I spent time with a good Sewing Buddy, I found a new favorite store and including the purchases for myself,  I stayed well within my allotted budget.  I doesn't get much better than that!

Monday, September 16, 2013

Finished: BPF FW-06-402 and V8689


I am terrified of color.  When I match a print with a solid, I want one color in the print, preferably the most obvious color, to match the solid exactly.  Matching solids is much more difficult.  Matching solids keeps me up nights.  One would have thought this fabric combination was a no brainer.  The blouse fabric has a dark red warp (or is it weft?) and a navy blue weft (or is it warp?).  The pants fabric is navy blue.  Perfect together, right?  Yet, I'm still not entirely comfortable with this pairing.  I have a real problem with color.

Blouse:  Vogue 8689

Pattern Description:
Long or short sleeved blouse with princess seams and front and back yoke.

Pattern Sizing:
This pattern comes in sizes 6 - 22 with custom fitting for A, B, C, or D cup sizes.

What did you particularly like or dislike about the pattern?
I liked the vertical seams.

Fabric Used:
100% cotton

Construction:
Sewing this blouse was really fun!  I love it when I have the opportunity to use my favorite foot, #10 edge stitch, so much.  And the 100% cotton fabric behaved very nicely.  In the past, I always pinned with the pins parallel to the cutting line.  This time, after watching Seven Core Sewing Skills at Daily Craft TV,  I pinned with the pins perpendicular to the cutting line.  It could have been my imagination, but it seemed to really make a difference – even with a rotary cutter.  The fabric laid flatter at the cutting line and hills and jagged bits that sometimes occur were eliminated.


Pants:  Burda Plus Fashion FW-06-402

Pattern Description:
Now that I'm semi-retired, I've adopted a very casual work "uniform" that consists of "Docker Knock-Offs."  I put welt pockets on the back of fly front pants, use a twill fabric and I call them Docker Knock-Offs.  Pair them with a top and I'm ready for a more casual work environment.

Pattern Sizing:
Burda's plus size range 44 - 52

Were the instructions easy to follow?
I've sewn this pattern a jillion times and I've developed my own sewing order.  I didn't use the instructions.

What did you particularly like or dislike about the pattern?
This is a classic, simply styled design.

Fabric Used:
Nave blue twill.

Construction:
When I make my Docker Knock-Offs, I vary the way I finish the welt pockets.  This time I chose a double welt with a button.


I'm glad the blouse has long sleeves.  I have several weeks before it's cool enough to wear it and I have time to get used to wearing the two colors together.  I'm hopeless when it comes to color.  I wonder if there is a support group for the color-phobic.

Tuesday, September 3, 2013

Wedding Dress Adventure: Chapter Three

It's almost time. The preliminary muslin fittings are finished.  The pattern pieces have been traced and stored in handy little mailing tubes. The Wedding Dress Adventure is about to begin in earnest.

So far, everything is on schedule (and I pray it stays that way). Sometime at the end of October,  Lindsey and I have to get together and shop for fabric.  She gave me permission to select the fabric without her, but I wouldn't want to rob her of another chance to ignore my suggestions and do things her way.  Early in the summer, I saw a lace I really liked on a hurried visit to B&J Fabrics in New York.  If we can't synchronize our schedules, I might just take her up on the offer and head back to New York and buy the fabric by myself.

Long distance dressmaking is going to be a challenge. Once the fabric is purchased and I'm ready to sew, I'll have to pack up my  machines and sewing supplies and spend several days in Richmond (in her one bedroom apartment with no TV) so she will be available for try-ons.  I remember how she hated to try on the prom dresses I made for her.  I hope I'm not met with the same resistance this time.  Especially after driving four to five hours on I-95.  Major construction won't start until well into the fall because in addition to sewing her dress, in October I'm giving her a shower here in Pennsylvania.  I can only focus on one thing at a time.  I suspect she asked me to give the Pennsylvania shower so I will stay out of her way while she plans the wedding.

I won't be sharing too many pictures of the dress in progress.  I don't want to jinx anything by revealing too much.  In the meantime, here is a picture taken during the last muslin fitting:


If my prayers are answered all goes according to plan, she'll be beautiful!

Tuesday, August 20, 2013

Finished: BSM 08-13-137

New Rule:  When looking for Burda Style Magazine patterns to sew, I should focus on current issues. 

What's the point of subscribing to a monthly, fashion forward pattern magazine if I'm sewing patterns from years ago?  I wanted a classic long sleeved blouse and I almost used a pattern from 2008. I looked through my index, refusing to look at anything before 2012 and found three or four suitable options, including 08-13-137.


Pattern Sizing: European plus size 44 - 52

Construction:  The most interesting aspect of this blouse was the sleeve construction.  The sleeve appears as set-in, but it is attached as if it were a raglan sleeve.  I didn't make that connection when I first read the instructions. I realized the similarity when I was well into the process of attaching the sleeve.   

First, the side seams, but not the shoulder seams, were sewn.    


Then the sleeve was attached to the armhole. 


Finally, the shoulder and upper sleeve seams were sewn in a continuous seam.


(The diagrams above are from  a different blouse in the September 2013 issue of BSM, not my blouse from the August issue. Just imagine the result being a set-in sleeve.)

I used to be so intimidated and annoyed by Burda instructions. But I was able to attach the sleeves without the benefit of the illustrated instructions. Sewers might be put off by Burda magazine's instructions, but one really does get used the them as you sew them more.

What did you particularly like or dislike about the pattern?
I liked the dart placement on this blouse.  I also like the way the sleeves are finished.  Most of my long sleeved blouses have cuffs.  

Fabric Used:
I really don't know what this fabric is.  I don't even remember when and where I bought it, although I think I may have bought it in San Fransciso during PR weekend.  This fabric behaves like challis.  It's soft and drapey and wrinkles a lot.

Conclusion: 
I can't imagine making a muslin for every garment I sew, but I see the advantages.  If I think of this blouse as a muslin, there are some changes I would make if I make this blouse again.  The sleeves are a little too long and the blouse is a little looser than I expected.  For my casual, semi-retired life life, this blouse is just fine.


Tuesday, August 13, 2013

Managing a Thread Stash

Some solutions are so obviously simple, I wonder if I'm the only person on earth who hasn't figured it out.  My problem of neatly storing my growing stash of Wawak thread is a perfect example.

I have accumulated a lot of thread.  I use up to six spools of matching thread on each garment:  five for the serger and one for the conventional sewing machine.  The conventional spools of thread I buy from JoAnn have a slot to control the thread tails. No problem there.  But the spools I buy from Wawak are different.  They have no slot.  My compartmentalized thread storage drawers were turning into a mass of tangled thread.  The simple solution was  Hugo's Amazing Tape.  It's a vinyl tape that sticks to itself without adhesive.  I cut a length of tape about five inches long and wrap it tightly around the  spools.  No adhesive residue on the thread and no more loose ends making a tangled mess!  And it's reusable!  I wasn't able to find it locally in any brick and mortar store,  but it's available online at Nancysnotions.com, Amazon.com and CreateForLess.com.  It comes in 1/2", 1" and 2" widths.

Now, about those hundreds of thread spools – I always shop my thread stash before buying more thread.  Usually, I have the color I need so it's not necessary to buy more thread.  But … take a look at the picture above. There is still room for one more cube and hundreds of spools!


Don't hate me because I'm organized!

Thursday, August 8, 2013

Finished: BSM 07-13-143

It happens every summer.  The weather begins to cool long before I finish the hot weather garments in my queue.   I fell in love with this top as soon as I saw it at the end of June.  Now it's August and I hope there are a few more days hot enough to wear it.
BSM 07-13-134


Pattern Description: 
Sleeveless top with two different front darts.

Pattern Sizing:
European Plus size range: 44 - 52

What did you particularly like or dislike about the pattern?
I love the quirky mismatched darts.  For the gathered dart, I used clear elastic to control the gathers.  The gathered area had to be a specific length to fit within the dart.  I marked the distance on the elastic.  Then I matched the marks on the elastic with the marks on the garment by stretching the elastic as I sewed it onto the garment.  Nice smooth gathers resulted.

stretched elastic over area to be gathered (sample is pictured)
smoothly gathered dart

Fabric Used:
Rayon Batik.  I bought this fabric when I visited Les Fabriques, my favorite fabric store in Charlottesville, VA.  (The store is in it's third location since I first went there in 2008.  I'm worried that the next move will be out of business.)

Pattern alterations or any design changes you made:
The changes I made were minor.  The instructions called for a hand sewn hem.  I sewed mine by machine.  I also sewed down the neckline facing by machine.

Conclusion: 
I like this top.  It's as comfortable as a t-shirt but much cooler. It would have been perfect for the heat wave we had in July.  I'm not wishing for another heat wave, though.  Just a day or two with temperatures in the upper 80s.


Friday, August 2, 2013

Finished: BPF SS-08-403B and 406B

Technical drawings
It's been quite a long time since I've made one of my matchy-matchy-bought-to-go-together outfits.  I made this outfit with fabric I bought at Britex during PR Weekend in San Francisco.  The patterns are from the Spring/Summer 2008 issue of Burda Plus Style.


Blouse SS-08-406B
Pattern Sizing:
This patten is from Burda's Plus Size collection.

Were the instructions easy to follow?
Burda's instructions are what they are.  They are no longer and issue for me.

What did you particularly like or dislike about the pattern?
I like the way the darts were part of the design details.  The bust darts started in the armscye.  There are also front darts and darts in the back.  I see the darts as a design detail and not just a feature to define the shape of the blouse.

Fabric Used:
I used a batik.

Pattern alterations or any design changes you made:
I never liked the collar on this blouse.  The collar and the v-neck were not a good combination for me, so I left it off.  I liked the purely decorative draw string, but I didn't include it.

Conclusion:
This pattern could very easily become a TNT - even though it is already five years old.


Pants SS-08-403B
Pattern Sizing:
From Burda's plus size collection.  These pants and the above blouse are featured together.

What did you particularly like or dislike about the pattern?
I really liked the design details in these pants.  I wanted something casual and sporty like cargo pants – with decorative seams and lots of pockets. This pattern was the closest I had to what I wanted.  I especially wanted pants I could roll up into capris, but that is not what I got.  The length is more cropped than capri.  I should have chosen another seam finish if I planned to wear these rolled up.  But since the length is a little strange I may not wear them rolled up.

Fabric Used:
I used a lightweight twill.  Perfect weight for summer.

Pattern alterations or any design changes you made:
I seldom make pattern alterations to my Burdastyle patterns.  I'm not as fit-picky as I should be.

Conclusion:
I like these pants as pants.  I suppose I could adjust the pants so they rolled up to a shorter length.  But they are finished now and I'm ready to move on to another creation.

Monday, July 22, 2013

Mother of the Bride Dress

My daughter is not the only one who has to look beautiful at her wedding.  I have to look presentable, at least!  Of course, all eyes will be on her, but when the new in-laws are asking, "Who is the mother?", I want them to respond with "Ohhh!" not "Ewww!"  It's time to think about my own dress.

I.  Fabric:


This is a poly satin I bought at B&J Fabrics in New York.  Lindsey's colors changed slightly since I was looking for MOB fabric during PR Weekend in San Francisco.  I wanted either satin or silk shantung.  This particular satin won because of the color. 


II.  Pattern Options:

  1. BSM 09-09-138   I sewed this pattern for the wedding of a good friend's daughter last fall.  It's already traced and ready to go.  That's a major advantage when crunch time approaches and I have tons of things to do.
  2. BSM 07-12-139   I chose this dress for the collar treatment.  I think it will make up nicely in satin.
  3. BSM 02-13-140  I like the sleeves on this dress. They dress up an otherwise plain silhouette.  
  4. BPF SS-10-427  This is another dress I've already made so it's just waiting to be sewn.
I have so much respect and awe for the sewing mothers of brides I've encountered online!  Katherine at I Made This sewed a wedding dress for her daughter and although I've never met her in person, her blog posts will be helpful and inspiring.  Connie of Couturesmith and Annette of FabriCate & Mira are my proof that a mother can sew her daughter's wedding dress and live to tell about it.  Both are real life sewing buddies and have generously offered to hold my hand and help me through this adventure (if only through e-mails and phone calls since they live so far away from me).

In order for the bride and her mom to be well dressed,  careful planning and time management are mandatory. The wedding is in April 2014.  It sounds so far away now, but I know it will come sooner than I think. 

Sunday, July 14, 2013

Wedding Dress Adventure: First Draft

First Draft
Sewing my daughter's wedding gown is turning out to be a real "learn by doing" experience.

I finally got her into the first wedding dress muslin, or "first draft" as she calls it.  I think the most difficult part will be arranging to be in the same state for fittings!  This photo was taken in a hotel room in Charlotte, NC.  Since neither of us lives in Charlotte,  I had to stuff two muslins into an already crowded car and schlep them to North Carolina for the first fitting. Lesson number one:  Take advantage of every opportunity for fitting.

Luckily, the gown won't need lots of adjustment.  She wants a roomy fit so she can eat at the reception.  (Do brides actually have time to eat at a reception?)

The next step was making a muslin for the lace overlay.  I had to combine two different patterns to get an overlay that matched the silhouette of the gown.  The overlay will have long sleeves and jewel neckline.  The pattern I'm using for the overlay did not have the empire waist, so I drafted the bottom of the gown bodice onto the neckline and sleeves of the overlay.  That involved …gasp… moving a dart!  I went to my vast library of sewing books and found the help I needed in The Pattern Making Primer (Barnfield and Richard, 2012). I bought this book, not because I needed another pattern drafting book, but because I happened to be in a book buying mood on that particular day.  Lesson number two:  Buy all the sewing books you can.  You never know when a book you bought on a whim will be just what you need.

It should have been immediately apparent to me, but it wasn't until I began to think about actually sewing the first draft of the overlay that I realized I should be using cheap lace instead of cheap muslin! Well, duh!  The ubiquitous 40% off JoAnn coupon came in handy!  I bought nine yards of JoAnn's Casa Collection special occasion lace. Lesson number three:  Save those JoAnn coupons. 

World's worst lace?
I've loved sewing for over forty years and sewing that lace from JoAnn may have been the worst experience of my sewing life.  I think Jack Nicholson said it best in Terms of Endearment - "I'd rather stick needles in my eyes."  No, wait. Let me express that more positively.  Lesson number four:  I need to be very, very, very careful when selecting the real lace.  I ran to my bookshelf, tripping over the cats as I ran, and pulled out Susan Khalje's Bridal Couture and once my hands stopped shaking, I read the chapter on lace.  Knowledge is power.  I felt better after learning about different types of lace.

After drafting three bodice patterns and sewing that horrible challenging lace, I have something for DD to try on when she is here at the end of August. (see Lesson number one above)

While most of the family members were in the same place at the same time, DD and her cousins looked for the junior bridesmaid dress.  I was told, kindly but firmly, that I had no input in the selection of the girls' dresses.  Getting three different girls, under 13 to agree on the dress was an adventure in itself.  But it was fun and I enjoyed seeing them all dressed up.  I was glad my input was not required.  Lesson number five:  Enjoy the ride and don't sweat the small stuff.

Saturday, July 6, 2013

Non-Sewing Post: A Few Pics from the Party

A recent finished outfit was for my youngest sister's 40th Birthday Masquarade Party.  Here are a few pics … just so you can see the outfit in action


Arriving with two of my nieces


Birthday Girl, Our big brother and his wife


Me shaking my groove thang


Birthday Girl and her family


Clockwise from top:  Birthday Girl, me, DD, oldest niece


I think BG wanted everyone to wear black so she would stand out in the crowd.


It was a great party and a wonderful opportunity for family and friends to get together.


Tuesday, June 25, 2013

Finished: V1260

Vogue 1260
I took a baby step outside of my comfort zone with this blouse.  First, it's not Burda!  I sew Burda patterns almost exclusively. Lately, I've been looking at, buying and actually sewing other patterns.  Second, it's not a style I would normally choose for myself.  Sandra Betzina wore it at PR Weekend San Francisco.  I liked it on her, even though I passed it over in the Vogue catalog.  I bought the pattern the next day without waiting for a $3.99 sale at JoAnn.

I find Today's Fit designs a little quirky.  Vogue's writers describe it like this: "Semi-fitted blouse. Shirred effect is caused by elastic sewn to seams.  Optional trim or cording. Optional sleeve tabs."  Today's Fit sizing is also a little quirky.  Sandra Betzina devised a whole new table of measurements that seem to suit me quite well.  One of the things I like about this pattern is the many options it provided.  It can be color-blocked or solid, trimmed or untrimmed, long or capped sleeves, buttons or snaps.  I chose individual options, but I like the gestalt of this blouse.  I couldn't name a particular feature that appealed to me, but I knew I had to have this top.

Sandra Betzina provided extra tips and techniques in her Today's Fit patterns.  The instructions were easy and the tips, in this case hemming with Steam-a-Seam and shirring with clear elastic were helpful.  I didn't use the Steam-a-Seam hemming technique because I couldn't find 1/4" Steam-a-Seam.  Sandra has you apply the S-A-S to the right side of the hem and double fold it, the iron to adhere the hem before sewing.  I just serged the edge and double folded using the serging as a guide.  The clear elastic shirring technique is much easier than the technique I normally use.  I cut the elastic to a specified length and stretched it as I sewed it to the seam.  When the elastic is relaxed and returned to it's original length the shirring appears like magic.  No fussing with gathers as I've done in the past.

I used my favorite summer fabric - LINEN!  I love sewing and wearing linen, in spite of the wrinkles.  This color is not the best for me, but I loved it on the bolt.  Still, I'm happy with this top because it represents a change for me.  I usually sew Burda and I usually stick to boring plain designs. This is a nice, light top for summer.  and it will be perfect for the 90º+ days I know are coming.

Another step outside my comfort zone:  I didn't have to crop off my head in this photo.  I use a self-timer to take photos for this blog.  I have a hard time producing a natural looking facial expression when I'm interacting with a camera instead of a human.  I end up looking like I just witnessed (or committed) a vicious murder. So, I spent $75 on Photoshop Elements so I could, among other things,  pixelate or otherwise distort my face.  And wouldn't you know, after spending the money, somehow I managed to squeeze out a natural looking smile.