Thursday, December 27, 2012

All I Wanted for Christmas

Last Christmas, my Darling Daughter surprised me with a Caribbean Cruise.  We went in October and, in spite of Superstorm Sandy, we had a wonderful cruise.  My greedier self wondered how she would top last year's gift.  Well, she did.  She wants to learn to sew and asked for a sewing machine.  The gift is just as much mine as hers.  We spent the weekend before Christmas sewing together.  What gift could be better than that?

As soon as she told me what she wanted, I ran to my trusted dealer to select a starter machine.   I was shown two options in my price range: Babylock Molly and Singer Confidence Stylist.  The two machines were exactly the same price.  I chose the Singer because it had a few more bells and whistles and gave her more room to grow if she sticks with it.

So, on the Friday and Saturday before Christmas, I taught my daughter to sew.

First, she got familiar with using the machine, including good posture.

Before:  Aching back after 20 minutes

After:  Ready to sew for hours


Her first project was a pouch, and she was quite proud.

Look, Mom!  I did it!

Our next lesson was reading a pattern, layout and cutting.

Cutting out pattern pieces
Finally, she made her first garment, a skirt, KwikSew 3765 , which, when you compare construction techniques,  was very similar to the pouch!

First garment! (Unhemmed)
She was a very good student and her attention to detail borders on obsessive.  I also bought her a book,  Sewing 101, a very good book for beginners with DVD included and I recommended she take a class at JoAnn.  I wish she lived closer so I could work with her more.  But, I had a great time teaching her and she seems willing to keep sewing.

Monday, October 29, 2012

Never Judge a Fabric Store by It's Website

Recently, I visited my DD in Henrico County, VA, right outside of Richmond.  I always look for independent fabric stores whenever I visit a city.  An online search yielded Couture by LK Design, which did not have a website and Silk Trading Company, which did.  I was in Richmond to collect my DD before we set off on a Caribbean cruise, so I was mindful of spending money.  Silk's website promised high end silks and decorator fabrics.    I thought "high end silks" were not in the budget at that particular time and I was resigned not to visit any fabric stores during this trip.  "She's my daughter, after all," I told myself.  "I'll be back in Richmond again."  But, she doesn't own a television, and I had two days in her apartment with little to occupy my mind while she was at work.  (A mother can do only so much snooping.  I'm kidding.)  So, I ended up at Silk Trading Company anyway.

BSM 6-12-141B
The store was not the high end fabric salon I expected.  It was very much like every other fabric store I frequent on Fabric Row in Philadelphia and some of the stores in New York's Garment District.  No fancy displays.  No bright florescent lighting.  Just good fabric at good prices.  I was the only customer in the store and the sales associate tended to hover.  When I shop for fabric, I usually have no idea what I'm looking for until I find it.  I couldn't answer questions like "What are you making?" or "What kind of dress?"  The prices on the bolts were only suggestions and the sales associate was willing to negotiate a little.   I was able to find two pieces I liked;  one of the pieces will most likely be the dress pictured from the June 2012 issue of Burda Style Magazine.


My research on Couture by LK Design, including the review on Pattern Review gave me the same impression. As a matter of fact, it is very likely that I confused the two stores. I didn't have time to visit that store, but I can visit Couture by LK Design the next time I visit my daughter.

Sunday, September 16, 2012

My First Quilt Expo

Now that I have dedicated some time to quilting, I thought I'd go to my first quilt expo.  My opinion was: "These quilts will either motivate and inspire me or make me stop quilting all together because I will never measure up".  Both situations were true.

All done by hand!
The 2nd place quilt stopped me in my tracks.  This picture was taken with my iPod and doesn't do the quilt justice.  It's all hand appliquéd and hand quilted.  And it's huge - large enough for a king size bed; as if you would ever put it on a bed.   And the colors are bright and gorgeous!  After seeing this quilt, I shouldn't honestly call what I do quilting.

But, let's get back to reality.  This is the yellow ribbon quilt.  It's a paper pieced pineapple quilt.  I love it for it's simple elegance.  I can actually see myself making a pineapple quilt one day.  This is an achievable goal, whereas the Baltimore Album quilt above is a fantasy.  I'll never be that good. (Notice how I just throw quilting jargon around!!)

The blue ribbon quilt didn't interest me.  The highlight of that quilt was the actual quilting, which in my opinion, requires a whole different skill set than piecing or appliqué.  I'm working on being a passable piecer – I don't think I'll live long enough to become good at quilting.  Besides, without my camera, it would have been too difficult to photograph the subtleties of the quilting.

Of course, I did some shopping.  I want to make a small Underground Railroad sampler and I bought some 1860s reproduction fabrics.  1860s era fabrics are not as easy to find as one might think.  Apparently, the trend for making civil war era quilts has passed, just when I decide I want to make one.  Lucky me.  Also, a representative was demonstrating Oliso Pro Irons.  I had a horrible experience with this iron, so what did I do?  I bought another one.  File this in the "some-folks-never-learn" folder.  In my defense, I really enjoyed using the iron.  The 30-minute shut-off feature was great!  And the "show price" was considerably less than the sale + coupon price I paid when I bought the iron  in June.  If Oliso can lower the price for a show, why can't they lower the price permanently?  I told the sales person about my experience and he said I could have sent it back for a replacement.  Turns out, my iron wasn't the only one with problems.  The Oliso management changed manufacturers and  I was assured the problems have the eliminated.  Time will tell.

I saw a wide variety of quilts and quilters at the expo. There is more to quilting than just the traditional pieced blocks.  There were more "art quilts" on display than anything else.  I expected to see  the stereotypical  gray-haired, quilting grannies, but that was not the case.  I saw many different types of women there.   Except for the granny part, I have all of the qualifications to be a gray haired, quilting granny.  With all the quilting styles and quilters I think there is enough room in the quilting-sphere for me and what I do.


Tuesday, September 4, 2012

Finished: Top Cutting Line 12269 & Capris Burda 7669

Top: Cutting Line 12269

I've always liked Louise Cutting's demos.  I own volumes 1 - 4 of her DVD series and I expect to get volume 5 when it becomes available.  So it was only natural that I sew one of her patterns.


Pattern Description: 
From the pattern envelope:  "Watching the sunset is a cherished ritual for Anna Maria in her updated camp shirt and ankle-length cropped panel pants with side pockets.  It only takes about three minutes for the sun to disappear after it touches the horizon but it always inspires spontaneous applause."  
You gotta love Cutting Line Designs patterns.  A basic pattern description is embedded in an evocative passage!  You can sew a blouse plus you have the seeds for a creative writing exercise!  (Anna Maria walked down the pier, away from the sea and remembered Ramon ………)

Pattern Sizing:
XS to XL (bust measurements:  XS 30"- 32"  XL 45" - 48")  The pattern runs a little large in my opinion.

Were the instructions easy to follow?
The instructions incorporated many of the techniques Louise Cutting demonstrated in the DVDs and TV appearances.  She advocates eliminating the bulk from the front of a collar by moving the seam to the back of the under collar. The technique is easier to carry out than to describe here and other experts have used it.  It works very well!  This technique is included in her directions and the necessary pattern changes are already done.  She also advocates the use of lots of Steam-a-Seam.  I didn't find it necessary to use that product where Cutting suggests. The instructions are very clear and well illustrated.

What did you particularly like or dislike about the pattern?
Lonely dart on the pattern sheet
Who doesn't love a good camp shirt?  This shirt runs a little large, though.  Front and back darts are an option.  I chose not to include them, but I will next time.  Rather than print the darts on the front and back pattern pieces, just the poor little lonely dart is on the pattern sheet.  That allows the sewer to measure her body and place the darts where needed.  A great idea and instructions for this process are given, but I was too lazy to go through with it.

Fabric Used:
Cotton.  I took a field trip to Sinking Spring, PA and visited the brick and mortar Fabric Mart, where I purchased this fabric and the fabric for the coordinating pants.

Pattern alterations or any design changes you made:
I sewed this blouse straight out of the envelope.  It could use a little adjusting.

Would you sew it again?
I would definitely sew this pattern again, but with some major changes.  it definitely needs the darts, if not a smaller size.


Conclusion: 
I like the Cutting Line Designs.  The are fashionable, a little different and appropriate for a woman of my age.  I'm sure I'll be purchasing more.


Capris: Burda 7669

Pattern Description: 
Fly front capris with a hem band and slit.

Pattern Sizing:
Plus size - 44 - 60 (European)

Were the instructions easy to follow?
Burda envelope patterns generally have easier and clearer instructions than the magazine patterns.

What did you particularly like or dislike about the pattern?
I like the hem band detail, which, of course, barely shows on the garments.  The hem band has a slit on the side.

Fabric Used:
Seersucker with a little lycra

Pattern alterations or any design changes you made:
I made both the long and capri versions of these pants some time ago.  At the time, the thighs were a little tight.  This time I added an inch to the thighs using pivot and slide.  I also made minor changes to the belt loops. I lengthened them and moved the top of the loop to the top of the waist band rather than have them float in the meddle of the waistband.


Conclusion: 
I give this outfit a C.    If I were on Project Runway, Heidi would tell me my outfit made her "sad".  Michael would say something catty and mean and Nina would be just plain mean.  Good thing I'm not on Project Runway.  The complete outfit is not what I visualized.  This was meant to be an outfit for my cruise, but it's just not colorful enough for the Caribbean.   I'll probably end up wearing the capris with a different top.

Monday, August 27, 2012

Peaceful Pineapples

I just finished a small wall hanging for my sewing room.  There was an empty space on the wall and I didn't want yet another picture.  I wanted something three-dimensional.  I looked in Home Goods, Pier 1 Imports and any store that sold home decor items.  Then I remembered, "Hey, I can sew!  What better way to decorate a sewing room than with something I sewed?"


About 18 months ago I attended a demonstration in which Gyleen X. Fitzgerald (Trash to Treasure Pineapple Quilts) showed her tool for making pineapple quilt blocks.   Naturally, I bought the tool and the accompanying book.  Recently, I bought a pack of 6 fat quarters to practice the block.   The result was this small wall hanging I call "Peaceful Pineapples."

The aspects of quilting I thought would bore me are the things I like most about quilting.  The repetition calms me and is addictive.   Once I got the rhythm of the process, it was hard to stop.  I was up way past my normal bedtime making the pineapple blocks. Then the next morning, I took the piece to my front porch for the hand sewing.  Hand sewing is also relaxing.  Sitting on the porch, in the quiet of the morning was very peaceful – hence the name "Peaceful Pineapples". 

I like quilting more than I ever thought I would.  The planning, shopping for fabrics, buying books magazines, and patterns is a lot like garment sewing.  Quilting has become another outlet for creativity.

Monday, August 20, 2012

If at first you don't succeed ……

Who would have thought giving away free patterns would be such an ordeal?  Not me!

Over two weeks have passed and the original winner, VWBug, has not stepped forward to claim her prize.  I randomly chose another winner from the original entries.


That winner is Debbie Cook!


Debbie, please send me an email (Elaray2003 at gmail dot com) with your mailing information and I will mail the patterns to you!

Congratulations.

Wednesday, August 15, 2012

Last Call

VWBug, where are you?


On Aug 2, VWBug was the proclaimed winner of three Hot Patterns.  VWBug has not come forward to collect the prize.  Unless I hear from VWBug, I will select another winner from the current entries on Monday, Aug. 20.


Thursday, August 9, 2012

Finished: Burda 8105

This pattern was a quickie.


Pattern Description:
In addition to the sleeveless to, the pattern includes a long sleeved jacket.

Pattern Sizing:
Plus size: European 44 - 58  USA 18 - 32

Were the instructions easy to follow?
So, easy!

What did you particularly like or dislike about the pattern?
The armhole was bound with bias tape and I got to use a recently discovered method of cutting bias tape.  I chose this pattern because I wanted to use the fabric, not because I particularly liked it.

Fabric Used:
At first, I believed this fabric was a quilting cotton.  I'm not so sure anymore.  I think the fabric is a print and not a real dyed batik.  There must be some synthetic fiber in it because it wasn't wrinkled after I washed it.

Pattern alterations or any design changes you made:
I'm calling the mis-matched front a design change!  It mis-matches almost perfectly! I don't know how that happened.  Usually if you cut a piece on folded fabric it aligns better than this!.

Conclusion:
This top can be worn with the capris I just finished.


≈ ≈ ≈ ≈ ≈ ≈ ≈ ≈ ≈ ≈ ≈ ≈ ≈ ≈ ≈ ≈ ≈ ≈ ≈ ≈ ≈ ≈ ≈ ≈ ≈ ≈ ≈ ≈ ≈ ≈ ≈ ≈ ≈ ≈ ≈ ≈ ≈ ≈ ≈ ≈ ≈ 


Oliso Iron Update

Just about one month ago, I splurged and spent way too much on an Oliso Pro iron.  Major fail!  I loved using the iron.  The auto-lift was cool but I really loved the 30-minute auto shut-off feature. But, my bad luck with expensive irons continued.  The auto-lift feature started making funny noises and froze in the up position so that the soleplate no longer comes in contact with the fabric.  Not a good thing for an iron.

*&^%$ IRON!
And if spending way too much on an iron wasn't humiliating enough - I NO LONGER HAVE THE RECEIPT SO I CAN'T RETURN IT!!!  I had a plan to return the iron that may or may not have been legal, (I'm asserting my 5th amendment rights and keeping the details to myself)  but the plan was thwarted by The Fates.

Lesson learned.  I give up on expensive stuff!

Friday, August 3, 2012

The Apron Odyssey


DD Lindsey enjoys cooking.  My BFF Denise promised to make aprons for her.  This started an epic that rivaled the travels of Odysseus.

Point A to Point B
Way back in April, while having a mini-vaction in Northern Virginia, Lindsey picked out fabric for aprons at G-Street Fabrics in Fairfax, VA .  I brought the fabric home with me while Linds went back to Charlottesville, VA.


Point B to Point C
In April, I was still working full time and distracted by my pending retirement.  (That's my story and I'm sticking to it.) It took quite a while before I sent the fabric off to Denise in New York State.


Point C to Point D
I don't know what distracted Denise, but it took some time before she finished the aprons and sent them back to me.  It took longer than necessary because USPS dropped the ball. She was promised the package would be delivered by a certain date but it never made it.  There were many worried and frantic phone calls while we waited for the package to appear – two days late.


It was worth the wait.  The aprons are great!  Denise and I learned how to sew together in junior high school.  She is an excellent seamstress, but doesn't sew lots of garments.  I still remember a suit she made over 20 years ago that inspired me to improve my sewing.

Why do I crave a big piece of pineapple upside-down cake?

There was enough fabric left for a second apron.


Point D to Point E
By this time, I'd retired and I was distracted by my new freedom (That's still my story and I'm still sticking to it!).  It took me weeks before I mailed the finished aprons to Lindsey.  Also by this time, she'd graduated, and started a job in Richmond.  I procrastinated even further on the pretense of waiting until she got a permanent address.


After USPS lied to Denise about delivery,  I used Delivery Confirmation so I'd know for sure when the aprons were delivered. I tracked the package and I called Lindsey to verify its arrival.  No package.  More worried and frantic phone calls.  Turns out, I neglected to include the apartment number on the package.  (Silly me.  Still distracted by my retirement, I guess.)  It stayed in the leasing office for three days while I worried it had been lost in the mail.


The distance between Point A, the point of purchase, and Point E, the final destination is 101 miles.  Yet the fabric traveled 866 miles to get to there.  The journey began on April 3 and ended three months later on July 20.  It would have been easier to teach the aprons to drive themselves to Richmond.


Getting the finished aprons to Lindsey did remind me of Odysseus and his little glitches.   Denise, Lindsey and I are all happy with the ending.  


Thursday, August 2, 2012

And the Winner Is ......

VWBUG!


Congratulations!  You've won the Hot Patterns.

Send your mailing info to: Elaray2003 at  gmail dot com and I'll get the patterns in the mail.

Thursday, July 26, 2012

Finished: McCall's 4097 & BWOF 03-2006-131C


Top:  McCall's 4097


Click here or see sidebar for Pattern Review
Pattern Description:
Very simple top with cut-on sleeves.  The sleeves have a slit.  The pattern includes shorts, capris and two other tops.

Pattern Sizing:
18W to 32W

Were the instructions easy to follow?
Yes, very easy.

What did you particularly like or dislike about the pattern?
This design does not conflict with huge checks in the fabric.  I had another pattern in mind for this fabric, but I didn't have enough fabric to accommodate the layout needed for the big checks.

Fabric Used:
Cotton blend

Pattern alterations or any design changes you made:
I didn't actually make any changes, but there is a design change I wish I'd made!  Louise Cutting recommends changing the shape of the  back neck facing so that it is about 6 - 7 inches deep at the center and gradually tapers to the shoulder.  According to Cutting, this change helps the facing stay in place and looks nicer on the hanger.  I wish I'd made that change on the top.  If I make the top again, I will include the altered back neck facing.

Would you sew it again?
In a solid color, this simple pattern is an excellent palate for embellishment  – I'm thinking silk screening.  I only wish I had the skill and talent to do some type of embellishment.

Conclusion: 
Originally, the fabric was paired with a more complex BurdaStyle Magazine pattern. The big checks required additional fabric and I didn't have enough.  I found this pattern online and immediately ran out to buy it.  I didn't trace off the pieces, so I was able to cut and sew it in one day.  I like patterns like that!

Capris BWOF 03-2006-131C


Click here or see sidebar for
Pattern Review.
Pattern Description:
Fly front capri length pants.  The pattern also includes long pants with back patch pockets.

Pattern Sizing:
European plus size 46 - 52

Were the instructions easy to follow?
The front pocket instructions were a bit of a challenge.  As usual the problem could have been solved with a diagram.  The pocket included a piping strip inserted into a dart.  The sewer is instructed to slash the dart, sew the piping to the top of the pocket opening and sew it into the dart as the dart is sewn.  Trying to write clear directions here is a challenge for me, but imagine how easy it would be to understand if I included a diagram.

What did you particularly like or dislike about the pattern?
In spite of the challenging instructions, I liked the front pocket.  I made these pants a long time ago and forgot how I did the front pocket, so it was a challenge to me again.  This time, I made notes on the instruction sheet and pattern piece so it will be easier next time.

Fabric Used:
Cotton twill.

Pattern alterations or any design changes you made:
I made none this time, but  I'd like to add a few design elements by cutting the legs into pieces for topstitched faux fell seams and adding a few decorative tabs.  I like it when a project inspires me to another project!

Conclusion: 
This is not the outfit I visualized when I bought the fabric, but it still suits the purpose.

Wednesday, July 25, 2012

HotPattern Giveaway!

So far, it been a hot summer in my part of the world.  I want to celebrate the hot weather with a Hot Pattern Giveaway.


Here are the patterns:

HP: 1052:  Classix Nouveau Great White Shirt

HP 1033:  Plain & Simple Fitted T Redux

HP 1120:  Classix Nouveau Primavera Dress
Here are the facts:

HP1052 Classix Nouveau Great White Shirt:  I picked this up from the pattern exchange table at PR Weekend 2011.  It's one of the first HotPatterns – back when there were three size ranges:  Slinky Girl, Glamour Girls and Curvy Girl.  This pattern is Glamour Girl (sizes 12 - 20). I've never used it, and I don't know if the former owner used it.
HP 1033 Plain & Simple Fitted T-Shirt Redux: This is only pattern of the three I actually used.  I cut away the instructions from the rest of the pattern sheet.  The instruction sheet, of course, is included. Otherwise the sheets are intact.  All sizes (6 - 26) are included.
HP1120 Classix Nouveau Primavera Dress:  This pattern has had only one owner - me.  I've never used it.  All sizes (6 - 26) are included.


Here are the rules:
  1. Indicate your interest in owning these patterns by leaving a comment on this post before August 1, 2012. Being a follower isn't required, but I invite you to become one if you haven't already done so.
  2. The winner gets all three patterns.
  3. The winner will be chosen by random number generator.  I'll announce the winner here on the blog and ask the winner to email their mailing address to me.
  4. No shipping outside the USA

The winner will be announced on Thursday, August 2, 2012.  Good luck!

Saturday, July 14, 2012

Finished: BSM 05-12-135 & BPF FW-06-402

Seems like a long time since I've sewn an actual "outfit" the way I used to.  I got sidetracked and started buying fabrics differently.  I bought single pieces.  But, I'm back into the outfit mode again.

See sidebar or click here for pattern review.

Blouse  BSM 05-2012 #135


Pattern Description: 
Just when I  was looking for a camp shirt pattern, BurdaStyle Magazine gives me this pattern.  It's a short sleeved blouse with a sleeve band.  Sometimes BurdaStyle gives me just the right pattern – just not always when I want or need it.  In church we often say, "He may not come when you want him, but He's always right on time." I don't mean to be blasphemous, but the same can be said about BurdaStyle.

Pattern Sizing:
European plus size - 44 - 52

Were the instructions easy to follow?
I see a BurdaStyle Magazine pattern and I think I know how to complete a particular technique, in this case, the sleeve band.  Then I read the poorly translated instructions and think, "Huh???"  I  parse out the translation and discover my technique and BurdaStyle's technique are the same.  The problem is the language.  Diagrams would have saved the time I spent scratching my head.   BurdaStyle doesn't do diagrams.  I accept that.   I still want pictures sometimes.

What did you particularly like or dislike about the pattern?
I like camp shirts and the sleeve band adds a little "something different" to an otherwise typical camp shirt.  I didn't even know I wanted "something different" until I saw the pattern.  My first thought was to omit the band, but then I thought I should really get freaky and keep the sleeve band.  The band is purely decorative in that it doesn't open, but it's a nice design element.

Fabric Used:
I bought this cotton-poly blend at G-Street Fabrics.

Pattern alterations or any design changes you made:
The buttons on the sleeve band were not included in the original design.  The instructions called for a hand-stitched X on band.  I think on a solid color lightweight denim type fabric, that would look okay, but I really couldn't picture it on this blouse.

Conclusion:
I can see this blouse made slightly more dressy by using a solid silk fabric.  As much as I like camp shirts, I'm sure I'll make this again.

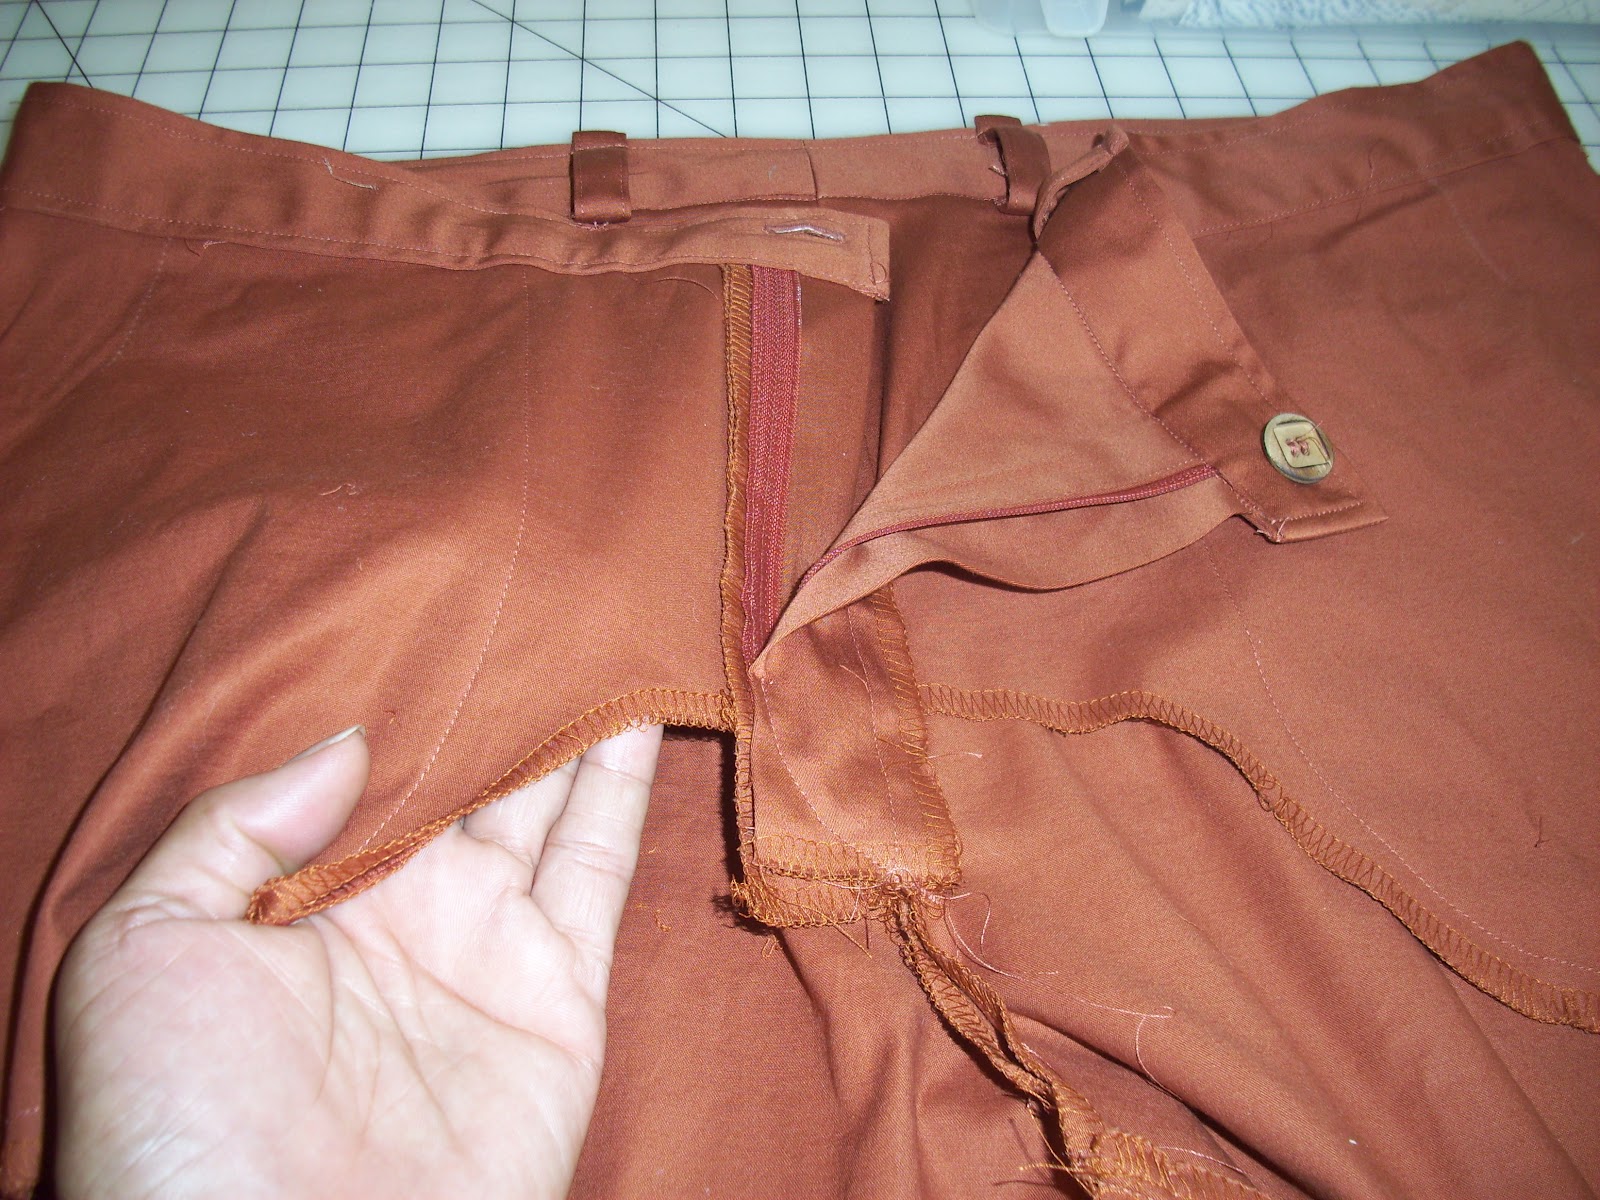
Pants BPF FW-2006 #402


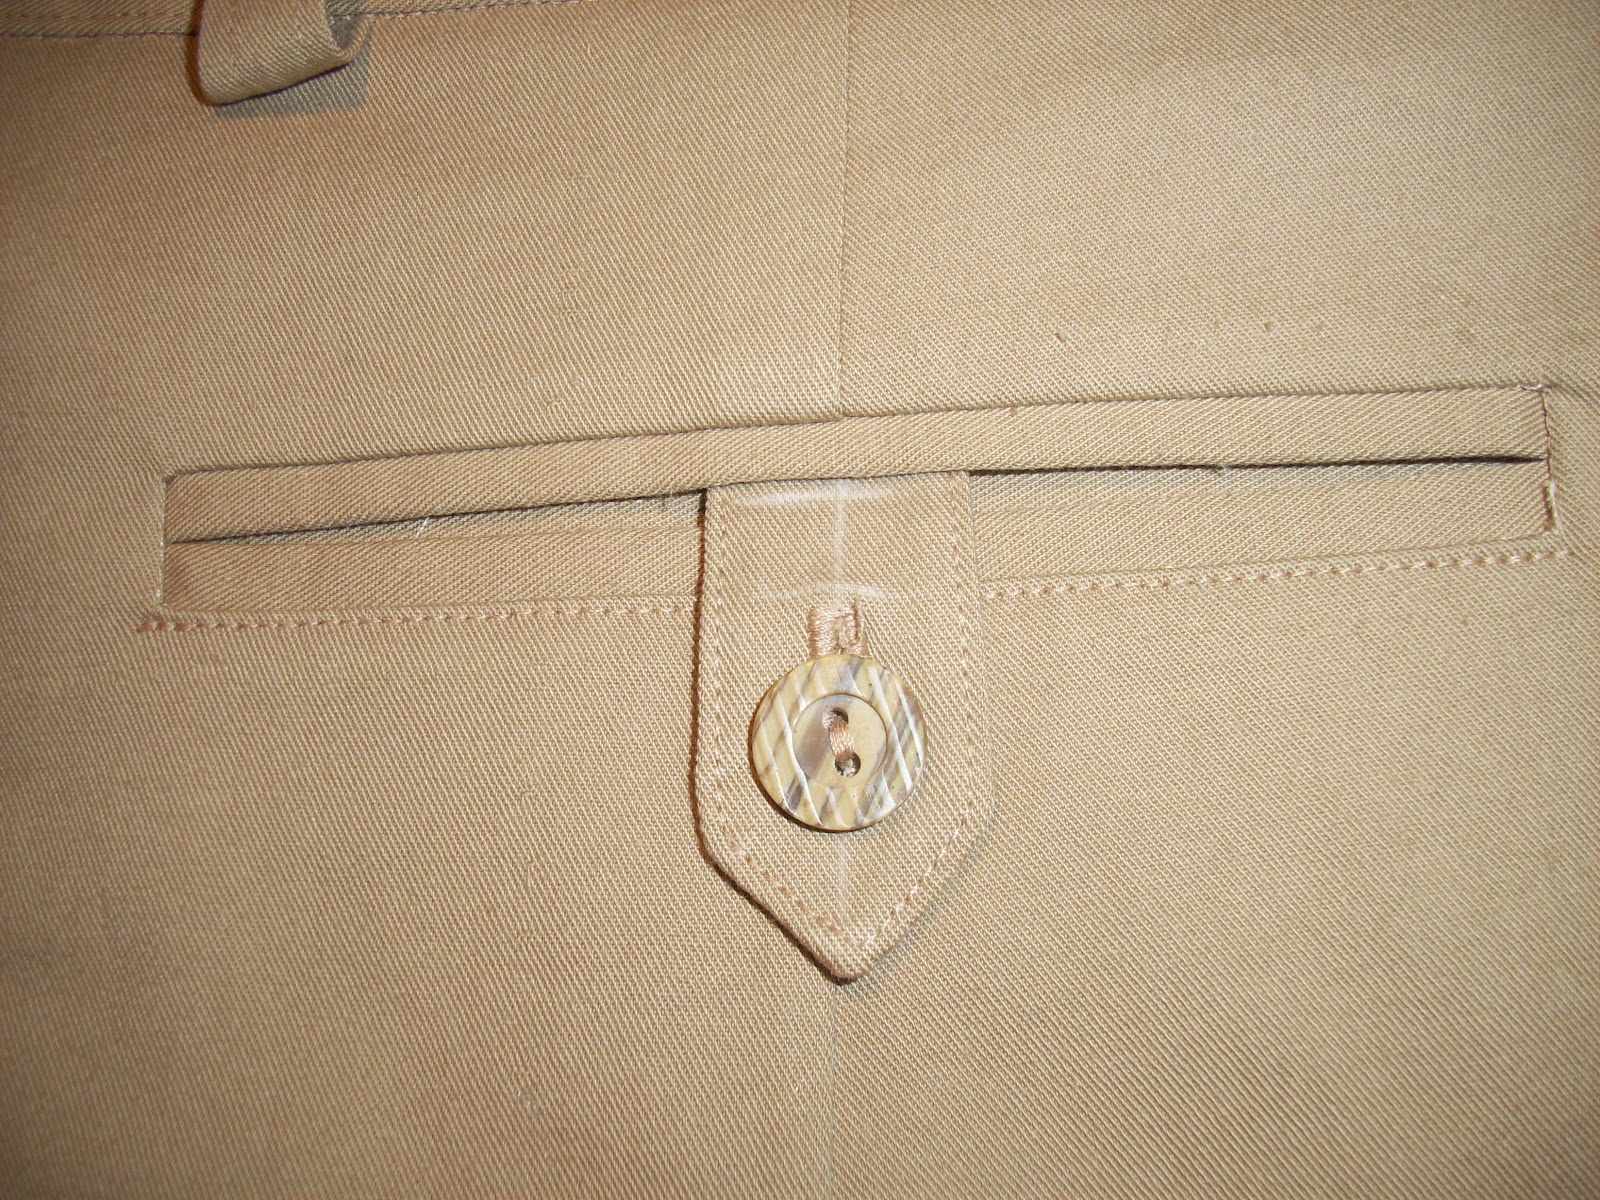
These pants are from my Docker Knock-Off collection.  They are typical fly front side pocket pants to which I added welt pockets.

Pattern Sizing:
European 44 - 52

Were the instructions easy to follow? 
If I had a nickel for every pair of fly front side pocket pants I made, I could probably go on an long vacation.  I didn't need or use the instructions.

What did you particularly like or dislike about the pattern? 
I like this pattern because, with a few simple changes, it transforms into Docker-style pants.

Fabric Used: 
Cotton-poly blend twill

Pattern alterations or any design changes you made: 
To get that authentic Docker look, I added single welt pockets to the back.  I was worried about putting a buttonhole directly on top of a dart, so I made a sample first.  There didn't seam to be any problems wit it.  I can't say enough about the welt pocket instructions in Pants for Real People.  I no longer fear the welt!

I extended the front yoke to the zipper extension.  This eliminates the unattached, flappy front pockets.  I don't remember a BurdaStyle pattern that included this extension.  I just have to remember to make the simple adjustment on every pair of pants.

Conclusion:
This pattern has definitely moved into the TNT category.  Now, I'm always on the lookout for twills in interesting or neutral colors to make more Docker Knock-offs.

Thursday, July 12, 2012

The Evolution of a Sewing Room (cont.)

Chapter 2

A New Place to Sew


More room to sew
The sewing room move is done!  I patched holes with tape and spackle and did some touch-up painting.  The Salvation Army took away my daughter's bedroom furniture. I vacuumed corners that had not seen the sun in years. Yuck.  The room needs a major cosmetic re-do, including painting and carpet removal.  But in the meantime, I have a new place to sew!

At first, the curmudgeon in me wanted a "no-one-is-allowed-in-here-but-me" sewing room.  I considered getting rid of the bed, but that wasn't practical.   I still have relatives who like to visit and they need a place to sleep.   Besides, I designed and built the cutting table expressly so it would fit over a bed.  It would be a shame to deny the table its destiny.

I considered the major drawbacks of my former sewing room and addressed them. In the small sewing room, my cutting table was in a corner and only accessible from two sides.  Now I can access it from three sides.  As I'm fighting with laying out knits, the last thing I want to do is rotate the fabric or stretch over the table in order to pin or cut out a piece.  Now, everything is within reach because I can walk around to the other side of the table.  Funny how simple things like that can make such a difference.

Second, I have more storage space in a bigger closet.  As my collection of Burda magazines grew, I trembled every time I thought of getting rid of them.  Now,  I've got room for another five years worth!  And I have another bookcase in which to store fabric.  I may even acquire a stash!!!

As small and cramped as my former sewing room was, it was a functional space in which I was very comfortable. Now, my sewing space is functional AND roomy!  What more does a sewer need? 

For a guided tour, click New & Improved Sewing Space link under Pages in the sidebar or click the link in the caption above.

Wednesday, July 4, 2012

Finished: BPF FW-2006-402B

My change in employment status necessitates a change in my work wardrobe.  I've always worn pants to work, but I tried to wear less casual career pants – at least once in a while.  Now, since I'll be crawling on the floor with toddlers and preschoolers, my uniform will be strictly casual.  With a few changes, #402 from the Fall/Winter 2006 issue of Burda Plus Fashion made up into Dockers-style pants I was looking for.

Burda Plus Fashion FW-06-402
See sidebar or click for PatternReview.com
Pattern Description:
Fly front, side pocket pants.

Pattern Sizing:
European plus size range;  44 - 52


Were the instructions easy to follow?
These are very basic fly front, side pocket pants.  I really didn't need the instructions.  It is a Burda magazine pattern so problem instructions are a given.

What did you particularly like or dislike about the pattern?
My intention was to knock-off Dockers.  Other people knock-off expensive designer fashions.  I knock-off Dockers.  How pathetic is that?  I like this pattern because it had the basic bones of a pair of Dockers.  All I needed to add were pockets.

Fabric Used:
Cotton twill, perfect for the type of pants I wanted.

Pattern alterations or any design changes you made:
I added double welt pockets to the back so the pants would look more like Dockers.  I used the instructions for double welt pockets from Pants for Real People.  I get good results when I follow those directions carefully.

Would you sew it again? 
I do plan to sew these pants again. They will be my new "uniform".   The next pair might have single welt pockets in the back, also using the instructions from Pants for Real People.  There is a welt pocket treatment in the August/September 2012 of Threads that I might try the next time I use this pattern.


Conclusion:
I plan to make a one or two more pairs of Docker knock-offs using this pattern.   And that will be the extent of my work wardrobe.  Semi-retirement is fantastic!

Saturday, June 30, 2012

The Evolution of a Sewing Room

Chapter 1

Where Did It All Come From?!?!?


One of the perks of Empty Nest Syndrome is the empty nest!  When I learned my daughter accepted a job in Richmond, VA,  I toyed with the idea of moving my small sewing room into her larger bedroom, but I talked myself out of it. However, she encouraged me.  In her words, "Why shouldn't you have a bigger sewing room?"

I believe my daughter, who so generously and lovingly encouraged me to take over her bedroom, saved every toy, storybook, shoe, notebook, sneaker, trophy and stuffed animal she ever owned in the eighteen years she occupied that room.  She was a good candidate for Hoarding: Buried Alive.  It's just as much my fault as hers. She didn't buy all that crap those things herself.  Everytime she was away at camp, I threatened to go into her room with a trash bag.  But she protested and I backed down.  As she pulled crap her things out of bookcases, the closet, the dresser and piled it on the floor, I admit, I almost lost it. Then, I thought about my new, bigger sewing room and kept my mouth shut.


With visiting and socializing with friends she may not see again for a long time, it took her three days to sort through and distribute all the crap her belongings.  If I had been given the freedom to dispose of it, everything would have gone to the dump. Thankfully, my daughter believes in "Reduce, Reuse, Recycle" and she was more responsible about getting rid of the crap stuff than I would have been.

It's going to take some time until the new sewing room is just the way I want it. First, I have to make my new space habitable and functional.  Then, I have to make it mine.

To be continued ………


Wednesday, June 20, 2012

Corny Cliché, but True

Today really IS the first day of the rest of my life.


No, I won't be spending 8 hours a day in my sewing room but I do have a plan for my new life.
  • I retired from my job, not my career. I'll continue the part-time independent contracting I've done for several years. 
  • My DD is treating me to my first cruise ever.  In the Fall, when my former colleagues are settling in to another school year, I'll be settling into a deck chair on a cruise ship.
  • I plan to take advantage of a local university program for Lifelong Learning which offers a variety of courses such as Introduction to Adobe Photoshop, Myth in Human History, and Quantum Mechanics for the "Spiritually Inclined" (huh?).  This program also entitles members to audit one undergraduate course per semester, if there is space.  
  • I no longer need a large work wardrobe so I plan to do more quilting. Or I may tackle that coat or tailored jacket I've wanted to sew for years.
  • My first BIG project will be to move my sewing room into the larger bedroom that was once occupied by my DD.  Finally, I'll have more room for more fabric and Burda Magazines.
Stress often comes with change; even a change for the better.  I'm a little nervous, but I'm looking forward to this new phase in my life.  For a number of reasons, it's the right time for me to retire.   Once I make the necessary mental adjustments, I'll be able to enjoy a more relaxed lifestyle.

Wednesday, June 13, 2012

I Can't Resist a Good Sale

I went to JoAnn to buy this …


and ended up buying this …


At least they're both yellow.

I was first interested in Oliso's Pro Smart Iron because of the feet that raise the soleplate. I love a good gimmick. Then I learned the iron has a "thirty minute extended shut off for sewers and quilters".  The thirty minute shut-off feature was icing on the cake.  I vowed to buy the iron the next time they were on sale at JoAnn.

So …… I found myself at JoAnn during a storewide sale.  I went there for yellow thread and buttons.  Not the most efficient use of non-renewable fossil fuel, I admit, but I gotta sew. The buttons were in the same aisle as irons and the irons were 20% off.  I had to buy it!  I had to.  In addition to the 20% discount, I got an additional 15% off with my teacher's discount card.  Total savings – $63.99!  The iron I'm replacing cost less than the $63.00 I saved.  I don't often indulge myself like this so I easily justified the extravagance.

Oh yeah, the buttons were 50% off, too.