Thursday, April 19, 2012

Finished: B5721

Click here or see sidebar for PatternReview
I love camp shirts for warm weather.  I haven't seen anything that looked like a camp shirt from Burda, my first choice in patterns, since April 2006.  I'm trying to move away from my "All Burda – All the Time" stance and sew other pattern companies, including Big 4.  Butterick used to be my favorite pattern company and I was happy to find B5721 for a warm weather blouse.  (The May 2012 Issue of Burda Style has a short sleeved button-up blouse 05-2012-135  but the issue arrived after I'd already started this blouse.)

I bought the fabric, a cotton-poly blend, to coordinate with pants fabric I had, but decided to go another way for that blouse.  That made this fabric perfect for experimenting with a non-Burda pattern.  Butterick didn't let me down.  I like the way this blouse turned out.

There was a little too much sleeve ease.  In addition to my usual finger easing,  (or "ease plus")  I used a method I saw demonstrated by Louise Cutting.  Cutting's method takes advantage of turn of cloth to ease in the extra fullness.  This method is done while pinning the sleeve to the armscye and didn't take any extra time and very little extra effort.  I don't know if piggy-backing two techniques is recommended, but it worked in this case.

Since this was a test garment, I didn't agonize over selecting buttons.  I dumped my buttons out of the jar and onto the fabric and discovered antiqued metallic buttons that looked good. They weren't even green! OMG!

This may be the first pattern from the women's size range I've sewn.  Usually I choose patterns from the misses size range.  Who comes up with theses labels anyway?  Somehow, I feel older and more matronly sewing women's than I did sewing misses.  While this crushed my body image and dented my self esteem, I have to admit, the blouse fits.  Just one more way the universe has of telling me I'm getting older.

Monday, April 16, 2012

My First Hot Pattern

I'm probably the last person on earth to try Hot Patterns.  What's not to like?  There is a great variety of designs from current and trendy to timeless and classic.  All designs come in plus sizes. There is even a whole line called "Plain and Simple" which describes my tastes exactly!  I decided it was finally time to try Hot Patterns.

For my first attempt, I chose HP1133:  Plain and Simple Fitted T.  I had over three yards of a knit I didn't like anyway - just in case the pattern didn't work out.  I chose the size based on my measurements and the fit was too awful to photograph.  With the leftover fabric I tried a second shirt two sizes larger and the fit wasn't any better.  The top really needed darts. The fault was not Hot Patterns' though. My body is just not suited for a fitted t-shirt. The fabric was perfect for experimentation so I really didn't mind throwing it away on two poorly fitting t-shirts. And the shirts sewed up very quickly so I didn't waste a lot of time.  There is a Plain and Simple Relaxed T-shirt that I may or may not try.  So far, I haven't warmed up to Hot Patterns.  (warmed up to Hot Patterns - get it?)

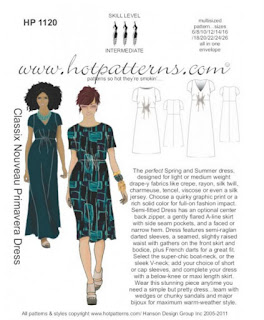
I ordered two patterns:  the t-shirt and HP 1120:  Classix Nouveau Primavera dress.  I still want to make the dress before I completely give up on Hot Patterns.  I'm sure I can find some $2.00/yd fabric at JoMar that I would like well enough if the dress works out and that I won't mind getting rid of if it doesn't.  When I read Hot Pattern reviews on PatternReview, they seemed to need lots of tweaking.   Trudy, the designer, always recommends making muslins, but I have been able to get away with not making muslins when I use Burda patterns.  I liked the online support available for HotPatterns on YouTube, but the YouTube support won't matter if I have to spend extra time fitting and making muslins.

I really want to like Hot Patterns.  I'm trying explore other independent patterns and to loosen the ties that bind me to Burda.  But if the dress pattern is as disappointing as the t-shirt pattern, I'll probably end up doing a giveaway.

Thursday, April 5, 2012

Spring Break

At the MLK Jr. Memorial
I just returned from a visit to northern Virginia and Our Nation's Capital. My daughter and I split the distance between us and met there to spend a few days together.  The main purpose of the trip was to see the Martin Luther King, Jr. Memorial.

We stayed in Fairfax, VA and our hotel was about 5 miles from G Street Fabrics' Falls Church location.  My original plan was to visit the Rockville, MD location while in the area, but when I realized how close I was to Falls Church, the plan changed. This location seems to have more square footage than the Rockville location (The Rockville store relocated to a smaller site a few years ago).  When you walk in, you think you are entering a small Bernina dealership, but when you go downstairs, you find yourself in a huge fabric store.  It felt a little cavernous – there is room for a lot more merchandise without the store being over-crowded.  I think of G Street Fabrics as a department store because of their wide selection and their prices. I took a quick peek at a price tag in the Designer department ($59/yd), and my purchases averaged $12/yd but great bargains can be found on the $2.97 table.

I needed fabric for spring/summer sewing and here is what I bought:

This light green waffled knit, from the $2.97 table, will become a polo shirt.


My daughter has developed and interest in cooking and my friend Denise designs and sews aprons.  Because she is a huge fan of SpongeBob Squarepants, she selected this pineapple fabric for her apron. (Five bonus points if you know the connection between SpongeBob and a pineapple.)


This pumpkin colored cotton twill will probably be shorts.


The khaki colored twill (with a little lycra) will end up as classic chinos.  This fabric is also from the $2.97 table.


The cotton shirting coordinates with both bottom weights.


I'm working on a quilt in which the binding was to be pieced from the scraps leftover after cutting the block pieces.   Wouldn't you know it, I was short about 8 inches.  This batik will finish the binding.


Even after buying all this fabric from the Falls Church location, I was tempted to stop at the Rockville, MD location on the way home.  Traffic on I-495 was horrible so I dismissed the idea.

This was an exceptional spring break.  The next time I see my daughter will be next month at her graduation from the University of Virginia.  That occasion is likely to be more hectic and won't be conducive to quality mother-daughter time together.  She is much more tolerant of my fabric shopping time now that she is older so we had a wonderful time together.


Saturday, March 31, 2012

Finished: BSM 10-2011-137 & BSM 02-10-137

See sidebar for PR Review or
 click here: Pants   Blouse 
Bringing this outfit to fruition was like a birthing a 12 pound baby after a 36 hour labor.  The biggest obstacle was my OCD about matching fabrics.  Then I took a little quilting detour in the middle of the project.  But, it's finished.

Pants:  BSM 10-11-137

I don't remember where I bought the fabric for the pants, but if I'd known it would be so hard to match, I would have left it in the store.  The fabric is woven with dark olive green and brown threads (and even a little black) so it doesn't know if it wants to be green or brown.  If I chose brown as a coordinating fabric, the fabric looked green and vice versa.  I took the swatch to three different fabric stores hoping to find a coordinating fabric for a blouse.  I'm not entirely happy with my final choice but I just refused to worry about it anymore.  Lesson learned:  Get over this unhealthy "fabrics have to match" obsession!

I added a partial lining to the front of the pants.  This technique was used on another Burda pants pattern I made recently and I like the results.  I traced the pants front, including the hip yoke section, to just below the knee.  After the pockets were finished, I basted the lining to the pants front and treated the two layers as one.  Technically, the technique I used is underlining, not lining.

From Threads website:
Underlining vs. lining
Let's clear up one point first: lining and underlining a garment are two different procedures, and depending on their purpose, one or both can be used in a single piece of clothing. Usually cut from a slippery fabric, lining is attached only at the garment's waistband or neck, and sometimes its hem -- otherwise, it hangs free in the garment. It's generally used to give a finished look to the inside of the garment, prevent seams from raveling, reduce wrinkling, help conceal some figure faults, and make a garment easier to slip on and off.

Underlining, on the other hand, is cut from the same pattern pieces as the fashion fabric and is attached before construction begins. Then, as the garment is constructed, the underlining and fashion fabric are handled as a single unit. Most often, underlining is cut from fine cotton batiste, light- to medium-weight cotton broadcloth, or silk organza. But a variety of other materials can also be used to underline a fashion fabric.


Blouse:  BSM 02-10-137 

I bought three different pieces of fabric to make a top for the pants.  The more I worked with the first piece, a green silk, the less I liked it with the pants fabric.  It wasn't the right green.  So I set it aside, hoping it wouldn't morph into a UFO, and I ordered a tan knit. I didn't like that either.  I finally found a dark olive peachskin at JoAnn Fabrics & Crafts.

The same main pattern pieces are used for the blouse and a dress.  The blouse instructions say to add 5/8" seam allowances and the dress instructions specify a 3/8" seam allowance.  Because the blouse front is placed on the fold, it is impossible to add 5/8" seam allowance to the front placket area – that would eliminate the placket opening. There has to be a 3/8" seam allowance on the placket opening and on the front band.  There is no mention of that in the seam allowance instructions.  Fortunately, I remembered this problem from the first time I sewed this pattern.  It's not enough to thoroughly read Burda's instructions for the garment I'm sewing.  Now, I have to read the instructions for all of the garments that use the same pieces.  Sheesh.

For some unknown reason, I wanted to make and use piping.  This blouse called for pleated trim around the placket and cuffs.  I substituted the piping.  I've never been overly successful making bias strips by the sew-a-twisted-tube method.  I found an easier method that requires folding a square or rectangle of fabric.  Another little tip:  The Bernina bulky overlock foot #12 is recommended for making piping.  However, my piping was much thinner than the channel in the foot so the foot wasn't securely holding the filler cord in position.  I used the three-groove pintuck foot #30 instead and it worked beautifully.

I used polyester peachskin to make this blouse. I know I vowed never to sew polyester again, but promises are made to be broken, right?  I was more concerned about the color than anything else.

Tuesday, March 13, 2012

Let There Be Light!

One month ago, if anyone asked me if I had enough light in my sewing room, I would have said "Yes, of course".  And I would have been wrong.

I used to have one lamp clamped to a bookcase that was used to light either the cutting table or the ironing board.  I also had a floor lamp that stood between the sewing machine and serger and I shifted that lamp between machines as needed.  I recently bought two separate lamps for the cutting area and ironing board. The arrangement worked so well I applied the same logic to the sewing area.   I bought two more lamps, one for the serger and one for the sewing machine, and mounted them on the wall so they directly lit the feed dogs.  Previously, when the floor lamp was positioned for the serger, the light source was on the right and a shadow was cast directly on the sewing area.  This new arrangement eliminated that problem shadow.

The difference was not as striking on the sewing machine. Apparently, Bernina's CFL sewing light is more efficient that Baby Lock's incandescent bulb.
 

I encourage every sewer to critically examine the lighting in their sewing space.  Then run, don't walk and buy more light.  Your eyes will thank you!

Saturday, March 3, 2012

Finished: BWOF 11-2007-132A and BSM 08-200-11-138

The Outfit

See sidebar or click for review:  Skirt  Blouse
It seems like a long time since I've sewn a coordinating top and bottom.  I haven't been able to find coordinating pieces of fabrics when shopping.  The colors are quite a bit brighter than I'm used to wearing.  I hope I have the guts to wear it.


The Skirt:  BWOF 11-2007-132A

I like this skirt a lot, but it highlights a problem I'm having with Burda Magazine.  This skirt came from a 2007 issue – when it was called Burda World of Fashion.   I really don't have the space to store old Burdas. But I'm still finding things I want to make in older issues so I don't want to get rid of them either.  I've already given away 2005 and 2006 and I'm afraid to get rid of any more.  This issue was in the next batch to be disposed of.  How am I supposed declutter when my clutter is still useful?  I guess I'd better find some way to store them.

I'm trying to incorporate techniques into my sewing that increase the value of my garments.  Mismatched yoke seams at the zipper scream "home made" not "custom made".   This technique has its basis in Claire Shaeffer's "keying a zipper" technique.

I sewed one side of the zipper.  Then I closed the zipper and, on the unsewn side of the zipper, marked with basting the point where the zipper crossed the seam.


I matched the basting to the seam on the other side before sewing that side of the zipper.


When the other side was sewn, the seams matched nearly perfectly.


It was really just that easy!  I don't know why I never used this technique before.


The Blouse:  BSM 08-2011-138

Leave it to Burda to make things difficult.  Rather than faced or turned-under slits, Burda has bound slits!  Didn't I just say, not three or four paragraphs ago, I wanted to increase the value of my sewn garments?  Any old pattern company can have faced or turned-under slits.  Even though I seriously considered simplifying the slits, I went ahead and bound them the way Burda said I should.

This blouse has lots of gathering.  I used my new favorite method – pulling up the bobbin thread, pulling out enough bobbin and needle thread to cover the length of the gathered area and zigzagging over the threads.  This makes gathering easier because the threads are stable and secure.  I would have preferred more match points for attaching the neckband to the neckline.

If I'd made a muslin, I would have seen the sleeve bands could have been a little shorter so they fit tighter around my arm.  Oh, well.  Maybe next time.